One of the main tasks of an affiliate marketer is to minimize the costs of ad campaigns. It is necessary to timely detect ineffective bundles and strive to increase the conversion rate of working combos. You can do all that with the help of trackers. Next, I will talk about the main features of these tools and how you can use them in your practice.
Table of contents
What’s a tracker?
In affiliate marketing, trackers are software that automates the collection and analysis of information about ad campaigns. These tools have a number of other uses, for example, for traffic and campaign management.
How is it different from a TDS?
In the past, affiliates often used TDSs in their practice. It is a system for distributing traffic. TDSs usually do not provide other features. Trackers are an improved version of that. They incorporate all the features of a TDS and many others. With their help, you can collect statistical data for deep analytics, work with reports, and integrate with ad networks.
What are they used for and by whom?
Trackers are used by affiliate marketers, advertisers and marketing specialists. These tools are used for the following purposes:
- analyzing the effectiveness of bundles;
- separating and redirecting traffic according to different parameters;
- generating reports on ad campaigns;
- conducting split tests.
By using trackers, you can increase work efficiency and significantly reduce ad costs by selecting traffic and bundles that have the highest conversion rate. Additionally, trackers make it possible to bypass Facebook’s moderation, hide statistics from affiliate networks, create landing page templates, and much more.
When don’t you need a tracker?
Such tools will be useful for any affiliate marketer. A tracker is not needed only when the specialist is fully confident in the quality of the bundle and traffic, so they don’t intend to conduct testing and analytics. But such cases are very rare. It is always necessary to get statistics and see the weak points of your ad campaigns.
What types of trackers exist
There’s a large number of different trackers on the market, which differ in terms of features, type and cost. There are 2 types of these tools: cloud and server solutions, each of which has its own advantages and disadvantages.
Server
This type of trackers is a program that must be installed on your server.
Advantages of server trackers:
- quick response time;
- unlimited traffic
- all the data is stored on the server.
Disadvantages of server trackers:
- additional server maintenance costs;
- you need to be able to configure the server and software;
- the server is physically tied to a specific location, so the speed of working with traffic when working with other GEO-settings is significantly reduced.
You’ll also need to purchase a license. If multiple servers are used in different countries, then the corresponding number of licenses will be required.
Cloud
Cloud trackers are an online service. All information is stored in the cloud, and the user does not need to install and configure software. The cloud solution covers all GEOs.
Advantages:
- automatic selection of servers depending on the GEO, which ensures high speed of data transfer;
- Setup is incredibly simple. And you don’t need to know the technical nuances of the servers.
The disadvantage is the necessity to subscribe to different tariff plans, which impose certain restrictions in terms of traffic volume or number of events.
Tracker costs
There are products that you can use for free for an unlimited time. (CPA Tracker and Prosper202 ClickServer). But most solutions are shareware (trial version). There are also exclusively paid trackers that do not have a free trial period.
How to use a tracker
All trackers have similar features and settings, so you only need to figure out one product to later on easily pick up similar tools.
How to connect a tracker
Server and cloud trackers are connected in different ways. In the first case, you need to have your own server on which you will need to download and install the program. To connect a cloud tracker, you need to choose a suitable plan and go through a simple registration procedure. After that, you can access your account.
Next, let’s go over the step-by-step procedure for installing the server version using Prosper202as an example. To do this, the hosting must have a clean domain and a database with no records. You can create a separate subdomain for the tracker to run on.
The first step is to go to the official website and download the program.
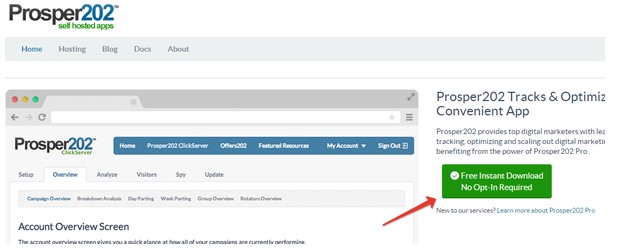
Next, the downloaded archive should be unzipped and all files transferred to the hosting using an FTP client. Then you need to go to the site. The following window will open.
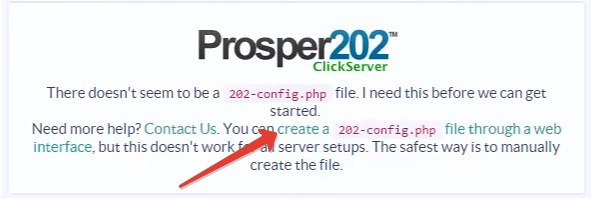
In this window, you can see that the configuration file is missing. To create it, you need to click on the link. Then a window will appear warning about the importance of memorizing or writing down hosting data.
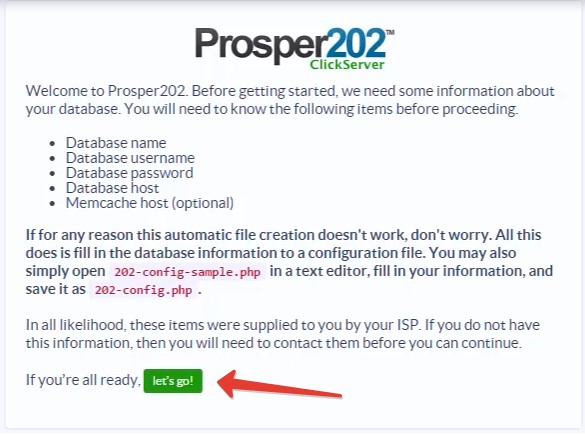
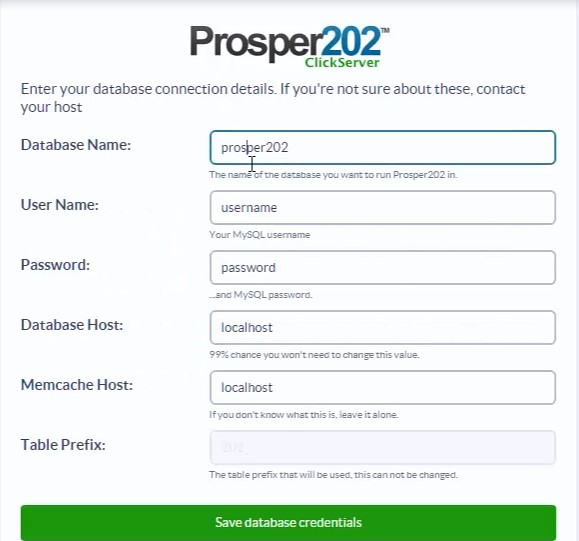
After clicking the “Let’s go!” a form will open in which you will need to specify the parameters for connecting to the database.
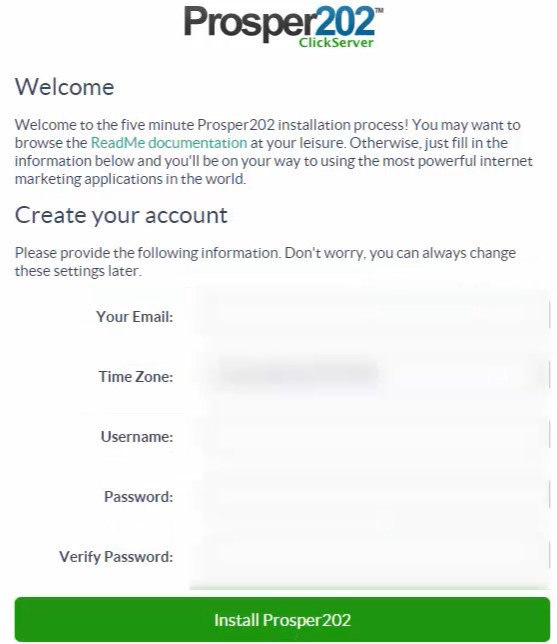
Then windows will appear in which you just need to click on “Next”. Then a form for creating an account will appear, in which you should specify your name, password, mail and time zone.
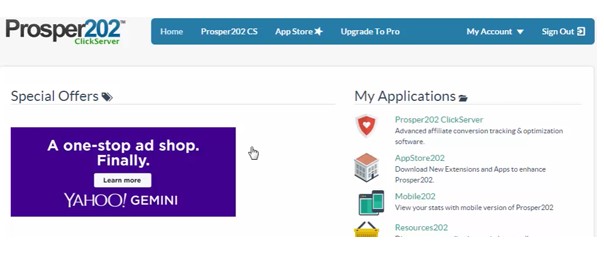
The next step is to click on the install button. When the installation process is completed, a window will open through which you can access your account.
Now all that’s left is to configure the tracker to fulfill your tasks.
How to configure a tracker
Now let’s go over setting up a tracker and creating an ad campaign using Binom as an example.
Choosing an affiliate network

To select an affiliate platform, go to the Aff. Networks tab (#1 on the image) and click on the “Create” button (#2) located to the left.
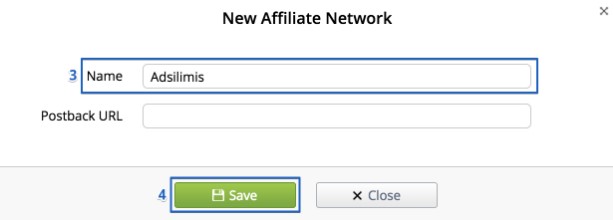
In the window that appears, you need to specify the name of the network (#3) and click the save data button (#4). If you need to create several partner networks, repeat this procedure as many times as necessary.
Specifying traffic sources

To do this, click the “Create” button in the Traffic Sources tab (#1). As a result, the following form will pop up.
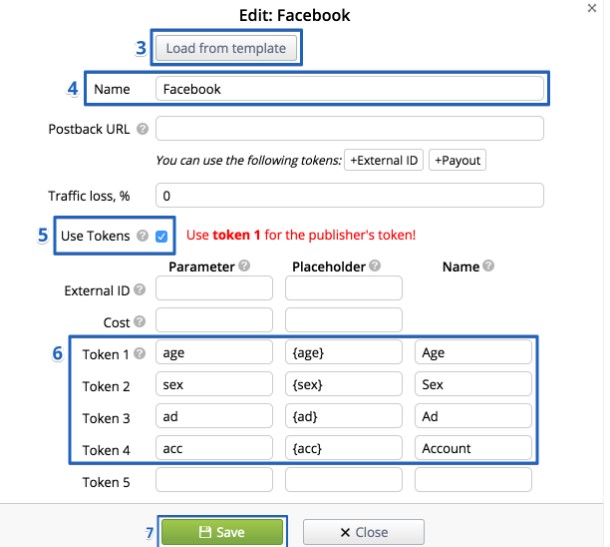
The “Load from template” button (#3) is used when it is necessary to load a traffic source from a predefined set of templates.
If the required template is absent, you can manually enter the source name (#4). In the above example, this is the social network Facebook.
If you need to use tokens, check the corresponding box (#5). Tokens make it possible to transfer data to the tracker from a traffic source, including device type, operating system, ad numbers, etc. Tokens are added in the appropriate fields (#6).
Then you need to click “Save”.
Specifying offers
To add offers to the tracker, you first need to log into your affiliate network profile. Then you should select the desired offer, open its settings and copy the Unique link. After that, go to the Offers tab in the tracker.

Press the “Create” button. The following form will open.
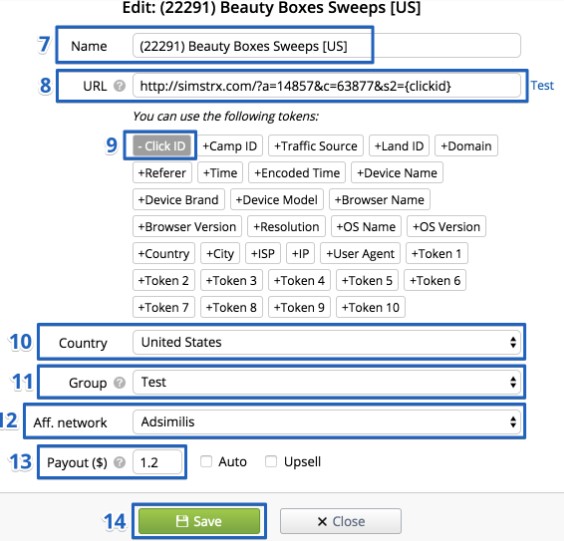
You must indicate the name of the offer (pos. 7). Then paste the copied Unique link. After that, the (clickid) token is added. Now, after the visitor sees the offer, the tracker will receive a unique click identifier for them. The &s1 parameter must be replaced with &s2 for the affiliate network to transmit the clickid.
Then you select the country, group and partner network. After that you need to specify the cost of the conversion and click “Save”.
Specifying the landing page

In order to add a landing page, you need to use the Landing Pages tab. After clicking on the “Create” button, the following window will appear.
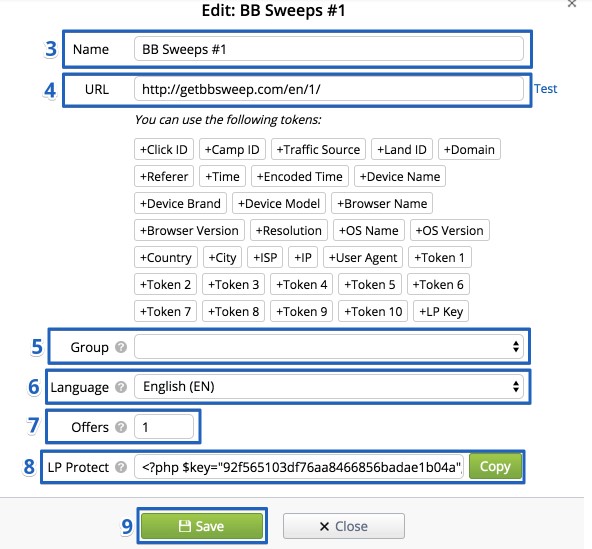
Specify the name and address of the landing page (#3 and 4). Then the group and language (#5 and 6). In the next field – the number of offers that are used for the landing page (#7).
If you need to protect the landing page from direct visits, you should copy the code (#8) and paste it at the beginning of the landing page code.
After that, select the settings in the top menu and go to the Tracking links section.
You need to copy the provided links and paste them on landing pages in places where visitors will go to the offers.
After that, in the settings, go to the Postback URL item.

The provided link should be copied and placed in the offer settings in the personal account of the affiliate network.
Making an ad campaign
To create a new campaign you need to go to the Campaigns tab

After you click the “Create” button, the following form will appear.

You will need to specify the name of the campaign and its group (#3 and 4). Then the traffic source and the cost per click (#5 and 6).
On the right is a form for configuring paths.
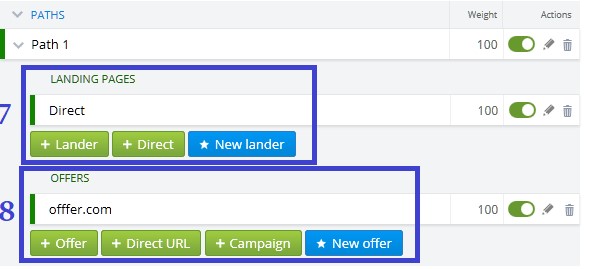
You can turn on the Direct setting (#7) to drive traffic directly without using a landing page. You can also add a landing page using the “+ Lander” button. You need to also specify the offer (#8).
After clicking the “Save” button, you will be able to see the campaign URL. You will need it to later drive the traffic you purchased.
Useful features
The basic features of trackers are described below using the Binom service as an example.
Analyzing advertising campaigns
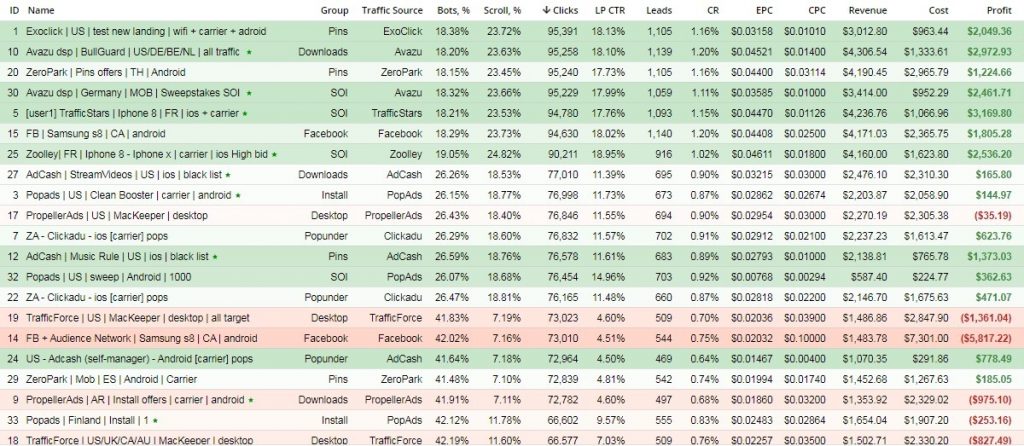
The user interface provides a summary of your campaigns in the form of a table.
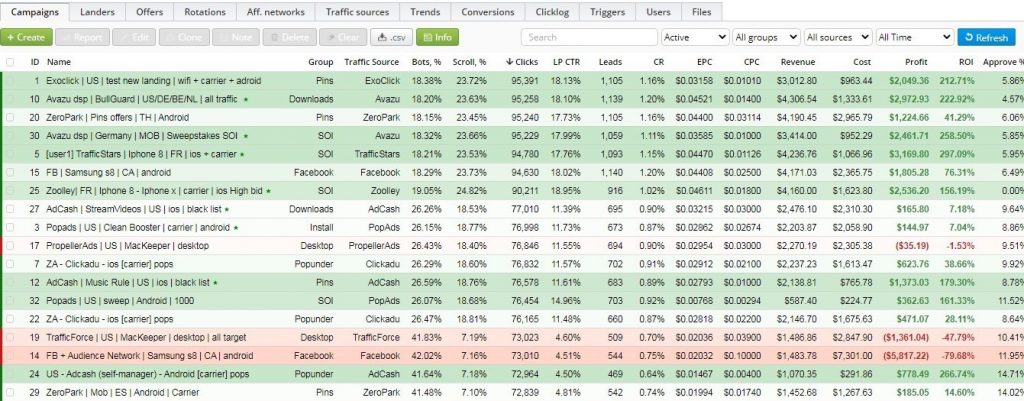
In this tab, you can see all the main metrics of the campaign, including the number of clicks, percentage of bots, number of leads, ROI and profit.
You can click on a specific campaign, after which the “Report” button will become active. With its help, you can generate a report.
At the top are filters for selecting the required data. Generated reports can be exported in several different formats, including csv
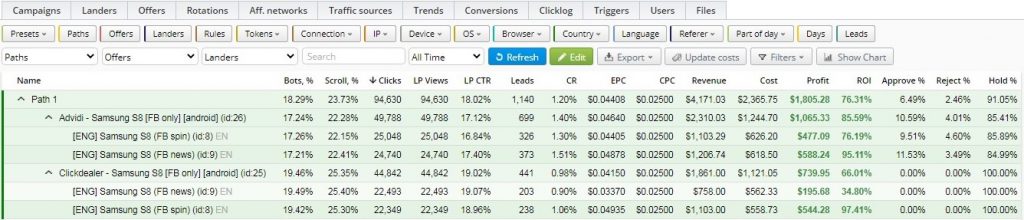
Analyzing landing pages
In the Landers tab, you can see the statistics of landing pages, where you can find information about the number of clicks, costs, profit, percentage of landing pages in Hold, Approved and Rejected, and other parameters.
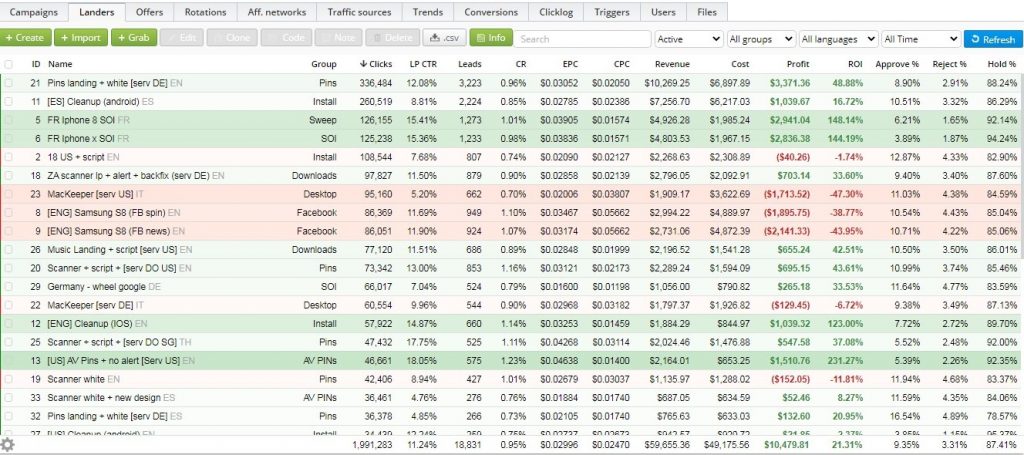
At the top left, there are filters for language, groups and time. After clicking on a specific landing page, it becomes possible to annotate, edit or duplicate it.
Analyzing offers
In the Offers tab, you can see how effective specific offers are. Names of the offers, GEO, number of leads, expenses, income, CR, EPC, CPC and other parameters are displayed here.
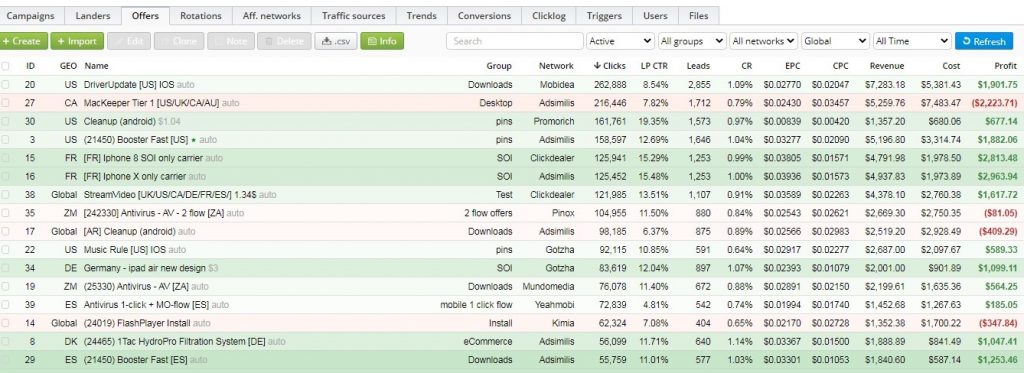
In the upper part there are filters by countries, groups, networks, time.
Analyzing traffic sources
In the Traffic sources tab, you can see detailed statistics and analyze traffic sources by the number of clicks, leads, ROI, CR, EPC, CPC, profit, and other parameters.

Analyzing clicks
The Conversions tab contains information about all the clicks. By default, data is sorted by click time. You can check the click id, traffic source, campaign and offer name, status, geo and income received.
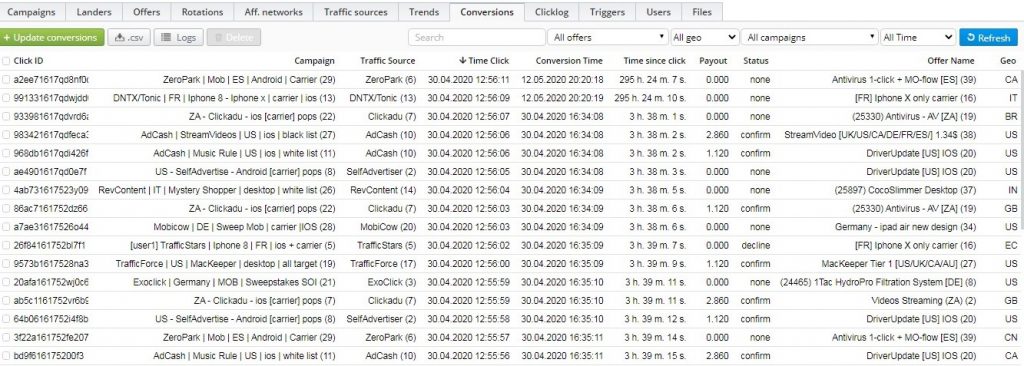
The data are filtered by offers, regions, campaigns, time. The resulting statistics can be quickly exported to csv.
Creating triggers
Triggers can be used to automate the working with advertising campaigns process.

They allow you to automatically perform certain actions after specified events take place. For example, after reaching the required number of clicks, users will be redirected to another landing page.
Above we covered only the basic capabilities of trackers. Most products have many additional tools and features that make it easier to work with advertising campaigns.
TOP-5 trackers for 2020
Below are 5 trackers that are the most popular among affiliate marketers. They have all the standard features and a number of additional ones.
AdsBridge
A multifunctional tracker that allows you to conveniently work with traffic and reports, analyze conversions and conduct split testing. An additional feature is the landing page builder.
Features:
- AdsBridge;
- bot filter and proxy traffic tracking;
- integration with other sites via API;
- the ability to work with Facebook and Adwords without a redirect;
- embedding PUSH notifications on landing pages;
- pixel tracking
- can be used by a team.
Cost: there are 4 plans from $29 to $379 per month. Offers a 2 week free trial period.
Prosper202 ClickServer

The distinguishing feature of this tracker is that you can use its feature for free. That’s why it is great for beginners and anyone looking to learn how to analyze traffic.
Main capabilities:
- Prosper202 ClickServer;
- tracking all transitions on links;
- analysis of conversions;
- custom filters;
- split testing;
- smart personalization feature;
- the WordPress plugin.
To work with the tracker, you need to install it on your server. Working with mobile offers is supported only in the paid version.
Cost: free.
Binom
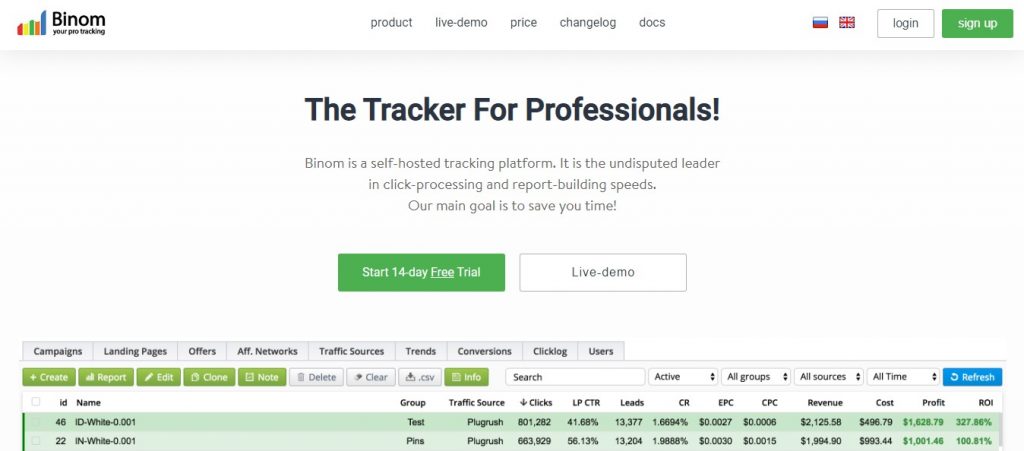
This is a server tracker, the most distinguishing feature of which is the high speed of processing clicks. Reports are generated instantly. There is an option to create white and black lists with comments.
Main features:
- Binom.org;
- ample opportunities for traffic segmentation;
- filters allow you to, well, filter out results simultaneously by several parameters;
- unlimited number of domains;
- suitable for teams, you can provide different levels of access;
- by grouping by bid, you can track the most profitable CPC;
- the Smart rotation feature allows you to direct the visitor to new landing pages.
Cost: $69 a month. Includes a 14-day free trial period.
Voluum

A cloud-based tool with many features. It makes it possible to monitor the progress of advertising campaigns in real time, filter data by GEO, devices, browsers, sites, and draw up visual reports. Mobile and web traffic are supported.
Key features:
- Voluum.com;
- all ad formats supported;
- protection from bots;
- an AI bundle testing option;
- you can set up notifications to quickly learn about important changes.
Cost: from $69 to $999.
PeerClick
A Cloud software product that allows tracking and optimization of advertising campaigns. The many features of this tracker allow affiliate marketers to increase profits and improve the efficiency of their bundles.
Distinguishing features:
- PeerClick;
- bot detection;
- the Smart Rotation option;
- cloaking;
- high processing speed;
- fast-to-respond tech support;
- many flexible settings;
- affiliate program builder.
Cost: $70 to $455 per month. There is a free plan limited to 100 thousand events per month.
Read about other trackers in our article “TOP 30+ Affiliate traking sofrware“.
Recommendations for choosing a tracker
When choosing a tracker, you first need to decide what you need it for, what features you’ll require. Perhaps, the features that free products offer will suffice. After that select a tracker by comparing the features and the cost.
Then you should make use of the free trial period (that almost all trackers offer) to test the product out. This will allow you to determine the best option. During testing, you should pay attention to the following points:
- how easy-to-navigate the interface is;
- how detailed and visual the reports are;
- how difficult it is to manage traffic flows and your campaigns;
- the quality of tech support.
When familiarizing yourself with the tools, make sure you try out all available features to objectively assess all the tracker’s advantages and disadvantages.
Read our review “TOP 50 affiliate software that will simplify the work of an affiliate marketer“.
Conclusion
Trackers will be very useful for any affiliate marketer or advertiser. They allow you to collect the necessary statistics and quickly optimize advertising campaigns. Many options make it possible to automate routine processes, as well as to change offers and traffic sources in just a couple of clicks. Through the use of trackers, you can find the most effective targeting settings and weed out bundles that are unprofitable.